7 April 2020

10. Stage 1-April 2020 Stage 1 is complete

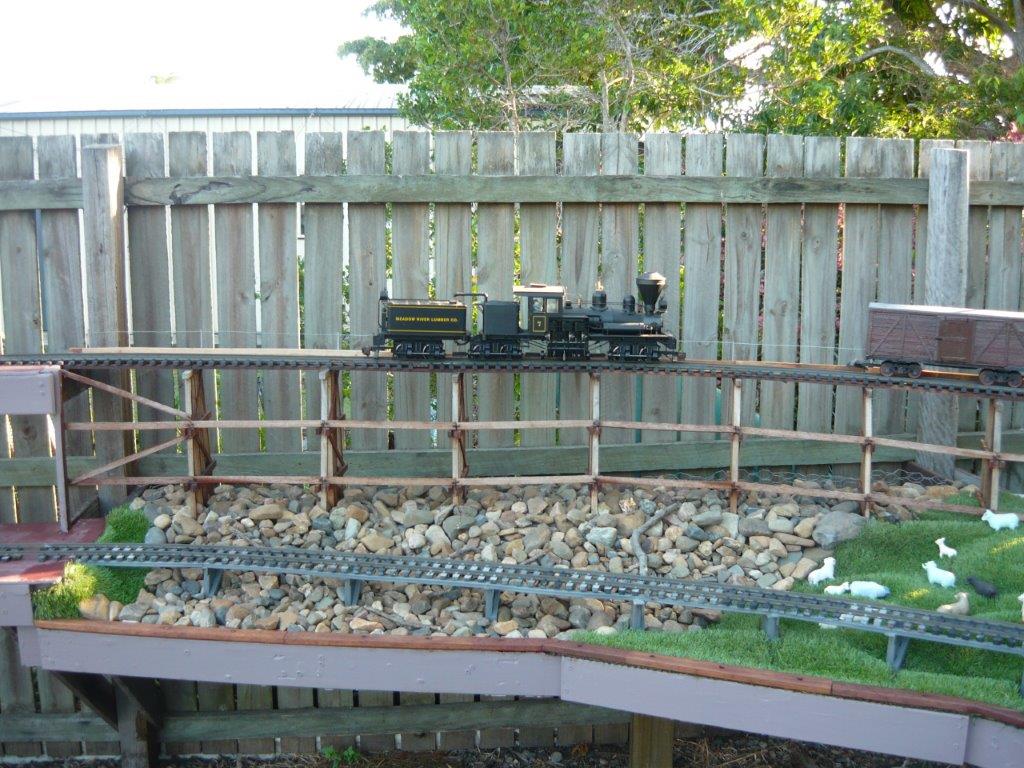
Stage 1 of the layout is now complete.

The High Trestle was completed, the Low Trestle was installed 

Baseboards across the back fence and down the side fence were installed.  
The silver bridge was removed after it was discovered that the deck was bent in the middle which gave a 21mm height difference between the middle and one end, plus while I was looking at it from a scenery point of view I could not think of a reason for it to be where it was.

Silver bridge that was removed

Baseboards down side fence

Down hill baseboard along side fence

After the installation of the baseboards they were painted with a paving paint and then the track was laid down.

Tracks across the Back Fence with Silver Bridge removed
Tracks down side fence
 After the track was laid some trains were run to check the integrity of the track on both the High and Low Trestles.  
I used the two largest Locos I have, a Bachmann 2-8-0 Consolidation (it has the biggest overhang) and a Bachmann 55 Ton 3 Truck Shay, for the High Trestle and my Cane Diesel and Side Rod Diesel for the Low Trestle all performed flawlessly. 
This justified  the extra time I took to get the track just right across the bridges.


Checking the High Trestle track
2-8-0 Consolidation


3 Truck Shay


Cane Diesel checking the Low Trestle

Side Rod on Low Trestle
I did do a bit of scenery and I still have to complete the rest but that is for another time.

Drama unfolds between the trestles
Skippy watches on
Back to Construction Logs

9. Stage 1-April 2020 Walkway and Safety Rail is fitted to High Trestle

To mitigate against any rolling stock toppling off the High Trestle I decided to fit a safety rail.
To mount the rail I added a walkway which will act as a catching device as well.
The walkway is made of treated pine timber cut from fence palings.

Walkway


Trestle with walkway installed


The safety rail is made from steel wire wrapped around 65mm galvanised nails that act as posts.

Close up of post and wire


Completed walkway and safety rail

Back to Construction Logs


25 March 2020

8. Stage 1- March 2020 The Low Trestle

After building The "High" trestle I thought it looked a bit out of place with a rocky base under it and a track on level ground in front,  so I decided to lower the roadbed in front of it and add a "Low" trestle and to continue the rocky creek bed/gully theme out to the layout edge.
After lowering the roadbed supports it became obvious that as this is a curved bridge I would have to add a corner to get the track around to the next baseboard.

Lowered Benchwork
Corner added, Bents roughed in to give an idea
After building the trestle I then found that one of the bents ended up right on the edge of the layout so I added a further corner piece to give a more gentle curve across the front and put the bent a bit further away from the edge.  It think it looks better as well.


Additional corner piece in front of bent added


To extend the rocks under the high trestle out under the low trestle to the layout edge
I built a mesh and chicken wire support for the rocks to sit in
The idea of the mesh is that rain will drain straight through and water will be able to evaporate thus reducing the length of time that the wood support will be wet.


Mesh Detail

To make the low trestle I used the bents recovered from a trestle bridge that was on my old layout, it was made out of plastic molding and it looked shiny and unnatural, so I scribed "wood grain" using a razor saw and painted it grey to try and get rid of the plastic shine.


Recovered bents before on left
The areas under the high Trestle that are not covered by rocks will be a "Meadow/Paddock" made from offcuts of synthetic turf simulating a grassy bank on the edge of the gully.
I have draped some turf over the area to get an idea of how it will look when finished.


Turf draped over area


Back to Construction Logs

13 March 2020

7. Stage 1-March 2020 Down the Hill from the High Trestle

I made track support to bring the upper line down from the low end of the High Trestle to the level of the lower line.
Originally it was 4.8 Metres (16 Ft) in length with a 255mm (10 inches) drop over the length  which gave a 5% grade.


Downhill Side View Original

Downhill Length Original


After thinking  about the 5% grade and decided that it may be to steep, so I extended the horizontal to 6.1 Metres (20Ft ) with the same drop of 255mm (10 inches) this gave me a grade of 4.1% which should be OK.

Downhill Side View Extended

Downhill Side View Extended
Because the support rails are in between fence posts I had to put in a small post between the fence rails, I use some galvanized C Purlin to do it.


Purlin Post
Back to Construction Logs

27 January 2020

6. Stage 1-January 2020 G The High Trestle is Finished

Work on the high trestle is finished.

The bents are 300mm (12") apart, so the overall whole length is about 3.9 M in length (13 Foot), the drop over the length is about 100mm (4").

I used 2 different methods to attach the bents to the road bed;
  • Originally I added a "Mud Sill" to the bent then attached that to the frame, but after a while it became obvious that it really was not a good method as I had to cut the bent legs to size as the height lowered, this I found time consuming with a high chance of errors there was also a high chance of splitting the sill when attaching to the frame.  
  • The second method allowed me to align the bents easier and the installation was a lot smoother with less chance for error as there was no measuring and cutting.
The next step is to build the roadbed that takes the track down to the lower level and put some wire mesh under the trestle to hold stones that will simulate a rocky creek bed/gully.


Trestle Full Length

Looking along Trestle Lengthwise
Right Hand End of Trestle showing grade
Trestle and Bridge
Original Bent Attachment Method
Second Bent Attachment Method

Back to Construction Logs

14 January 2020

5. Stage 1-January 2020 G The High Trestle reaches Halfway

The high trestle has reached halfway round the corner.  The next step is to complete the supports all the way around to the next fence post leaving out the corner post the black "planter pot" will cover that. 
At present I am not sure whether to stop the trestle at the fence post or continue it along a little further.


Trestle at halfway point
 
Supports to be built across this section
Back to Construction Logs

6 January 2020

4. Stage 1-January 2020 G Starting the High Trestle

To drop the upper level down to the same as the lower I decided to use a trestle bridge.

I spent some time over Christmas making the bents;
  • using 12mm garden stakes for the piles and top cap
  • some left over Merbau (an Australian Hardwood) for the braces 
 The braces were cut/ripped on my "Triton" table saw and the pile trimmed to length using a slide/drop saw.


Template of the bents
Jig used to form the bents
The garden stakes used for the bent piles

The garden stakes and Merbau plank

Decking timber cut for bracing

Decking timber cut for bracing

Bent assembly (without bracing timbers)
First Bent on railway (showing bracing timbers)

Back to Construction Logs