21 May 2020

3. Stage 2-May 2020 Lattice Fence extended across the yard from Side Fence.

I had 3 lattice panels left over from a renovation so I decided to use them as frontage for the loop as it crosses the yard.
The first panel extends from the side fence to form "Coleus Corner", while the other two extend from the loop access opening across the yard.

This effectively divides the yard and gives the impression that the inside of the loop is a garden in itself rather than just something behind a raised track.

This fence will form the front of the track base board support keeping it the same as "Coleus Corner". 
The finished "Coleus Corner can be seen on the right in the pictures looking into the loop and on the left in the pictures looking out of the loop.


Looking into the loop Coleus Corner on the right


Looking out of the loop Coleus Corner on the Left
Back to Construction Logs

18 May 2020

2. Stage 2-May 2020 Inside the Loop Landscaping started

With Coleus Corner now finished I have begun landscaping the inside of the loop, I am laying pathways, building a seating area complete with firepit for colder months and garden beds (using wood chip mulch and shrubs) so that the need to mow can be eliminated in the area.

I laid the border of the garden beds running about 700mm inside the garden edges that I built under the elevated roadbed. 
This border and the garden edges form the sides of a pathway that will allow me to follow trains around the loops with out having to push through gardens.
The space between will be filled with Decomposed Granite (which is sold at landscape suppliers as 'Deco') to form the pathways.


I constructed a ring of retaining wall blocks and filled the centre with gravel, I then 
added a firepit to sit on top of it
 Around the ring I dug out an outer ring 1.5 Metres wide between the retaining wall block ring, and an outer ring to be edged with concrete pavers. This will be filled with same 'Deco' as the pathways to provide a space for seating. 
The seating area will give me somewhere to sit and watch trains just running around the loops while relaxing.

Firepit and surround

Firepit with seating area dug out
To gain access to the inside of the loop I am building a lift up bridge (more detail in another post), which will be at the head of a path that leads to the sitting/firepit area off which will run the pathways that follow the layout.

Lift up Bridge opening with future Firepit path
The Lattice fence will be extended across the yard from the other side of the opening to enclose the inside loop, more on that in another post.

Back to Construction Logs

4 May 2020

1. Stage 2-May 2020 Stage 2 Begins - across the yard

Construction of Stage 2 has begun!!

It involves bringing the two tracks at the end of the downhill running around through some curves, with radii of 1.5M (5 Foot) inside and 1.8M (6Foot)outside, and then across the yard into the "town area.
This will create a loop, the inside of which will be accessed via a lift up bridge hinged at one end.

As there are no fence posts to attach to I have had to cut my own and concrete them in, they are made of galvanized "C" purlin (used to build sheds etc).


Benchwork Inside View showing future garden bed


I used a piece of lattice screening that was on my back deck before it was renovated, to provide a finished edge to the railway when viewed from the house. 
The lattice provides a shady spot behind it for shade loving plants.  A garden bed has now been built in front of it with a Frangipani Tree as focal plant.

Lattice Screen
Back to Construction Logs

7 April 2020

10. Stage 1-April 2020 Stage 1 is complete

Stage 1 of the layout is now complete.

The High Trestle was completed, the Low Trestle was installed 

Baseboards across the back fence and down the side fence were installed.  
The silver bridge was removed after it was discovered that the deck was bent in the middle which gave a 21mm height difference between the middle and one end, plus while I was looking at it from a scenery point of view I could not think of a reason for it to be where it was.

Silver bridge that was removed

Baseboards down side fence

Down hill baseboard along side fence

After the installation of the baseboards they were painted with a paving paint and then the track was laid down.

Tracks across the Back Fence with Silver Bridge removed
Tracks down side fence
 After the track was laid some trains were run to check the integrity of the track on both the High and Low Trestles.  
I used the two largest Locos I have, a Bachmann 2-8-0 Consolidation (it has the biggest overhang) and a Bachmann 55 Ton 3 Truck Shay, for the High Trestle and my Cane Diesel and Side Rod Diesel for the Low Trestle all performed flawlessly. 
This justified  the extra time I took to get the track just right across the bridges.


Checking the High Trestle track
2-8-0 Consolidation


3 Truck Shay


Cane Diesel checking the Low Trestle

Side Rod on Low Trestle
I did do a bit of scenery and I still have to complete the rest but that is for another time.

Drama unfolds between the trestles
Skippy watches on
Back to Construction Logs

9. Stage 1-April 2020 Walkway and Safety Rail is fitted to High Trestle

To mitigate against any rolling stock toppling off the High Trestle I decided to fit a safety rail.
To mount the rail I added a walkway which will act as a catching device as well.
The walkway is made of treated pine timber cut from fence palings.

Walkway


Trestle with walkway installed


The safety rail is made from steel wire wrapped around 65mm galvanised nails that act as posts.

Close up of post and wire


Completed walkway and safety rail

Back to Construction Logs


25 March 2020

8. Stage 1- March 2020 The Low Trestle

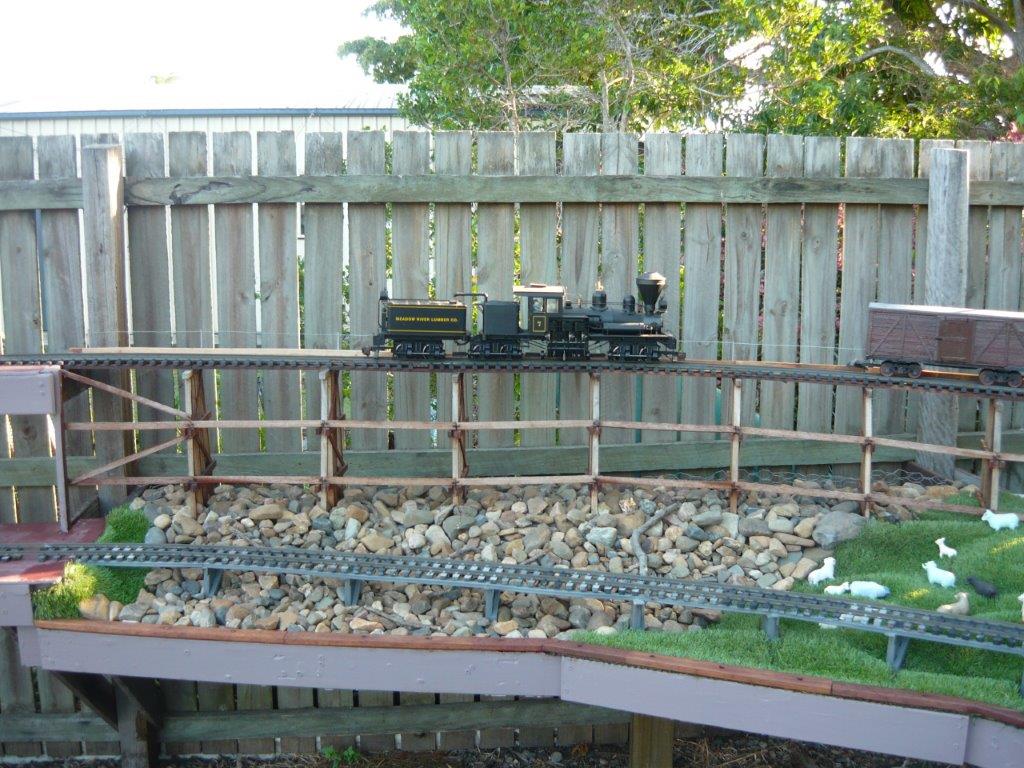
After building The "High" trestle I thought it looked a bit out of place with a rocky base under it and a track on level ground in front,  so I decided to lower the roadbed in front of it and add a "Low" trestle and to continue the rocky creek bed/gully theme out to the layout edge.
After lowering the roadbed supports it became obvious that as this is a curved bridge I would have to add a corner to get the track around to the next baseboard.

Lowered Benchwork
Corner added, Bents roughed in to give an idea
After building the trestle I then found that one of the bents ended up right on the edge of the layout so I added a further corner piece to give a more gentle curve across the front and put the bent a bit further away from the edge.  It think it looks better as well.


Additional corner piece in front of bent added


To extend the rocks under the high trestle out under the low trestle to the layout edge
I built a mesh and chicken wire support for the rocks to sit in
The idea of the mesh is that rain will drain straight through and water will be able to evaporate thus reducing the length of time that the wood support will be wet.


Mesh Detail

To make the low trestle I used the bents recovered from a trestle bridge that was on my old layout, it was made out of plastic molding and it looked shiny and unnatural, so I scribed "wood grain" using a razor saw and painted it grey to try and get rid of the plastic shine.


Recovered bents before on left
The areas under the high Trestle that are not covered by rocks will be a "Meadow/Paddock" made from offcuts of synthetic turf simulating a grassy bank on the edge of the gully.
I have draped some turf over the area to get an idea of how it will look when finished.


Turf draped over area


Back to Construction Logs

13 March 2020

7. Stage 1-March 2020 Down the Hill from the High Trestle

I made track support to bring the upper line down from the low end of the High Trestle to the level of the lower line.
Originally it was 4.8 Metres (16 Ft) in length with a 255mm (10 inches) drop over the length  which gave a 5% grade.


Downhill Side View Original

Downhill Length Original


After thinking  about the 5% grade and decided that it may be to steep, so I extended the horizontal to 6.1 Metres (20Ft ) with the same drop of 255mm (10 inches) this gave me a grade of 4.1% which should be OK.

Downhill Side View Extended

Downhill Side View Extended
Because the support rails are in between fence posts I had to put in a small post between the fence rails, I use some galvanized C Purlin to do it.


Purlin Post
Back to Construction Logs